Showing posts with label easy cooking. Show all posts

Wednesday, January 1, 2014

New Year's Day Brunch Bread Pudding


     My daughter gave me a new cookbook for Christmas and I couldn't wait to try out some of the recipes. I decided the Breakfast Bread Pudding with Peaches and Blueberries would be perfect for brunch on New Year's Day. After all, this is the day where we eat anything and everything because we know we have to "be good" again starting tomorrow...right?

     The ingredients were simple and easy to put together. Preheat the oven to 350 degrees, spray a 9x13 pan with PAM and you are ready to put this breakfast dish together.

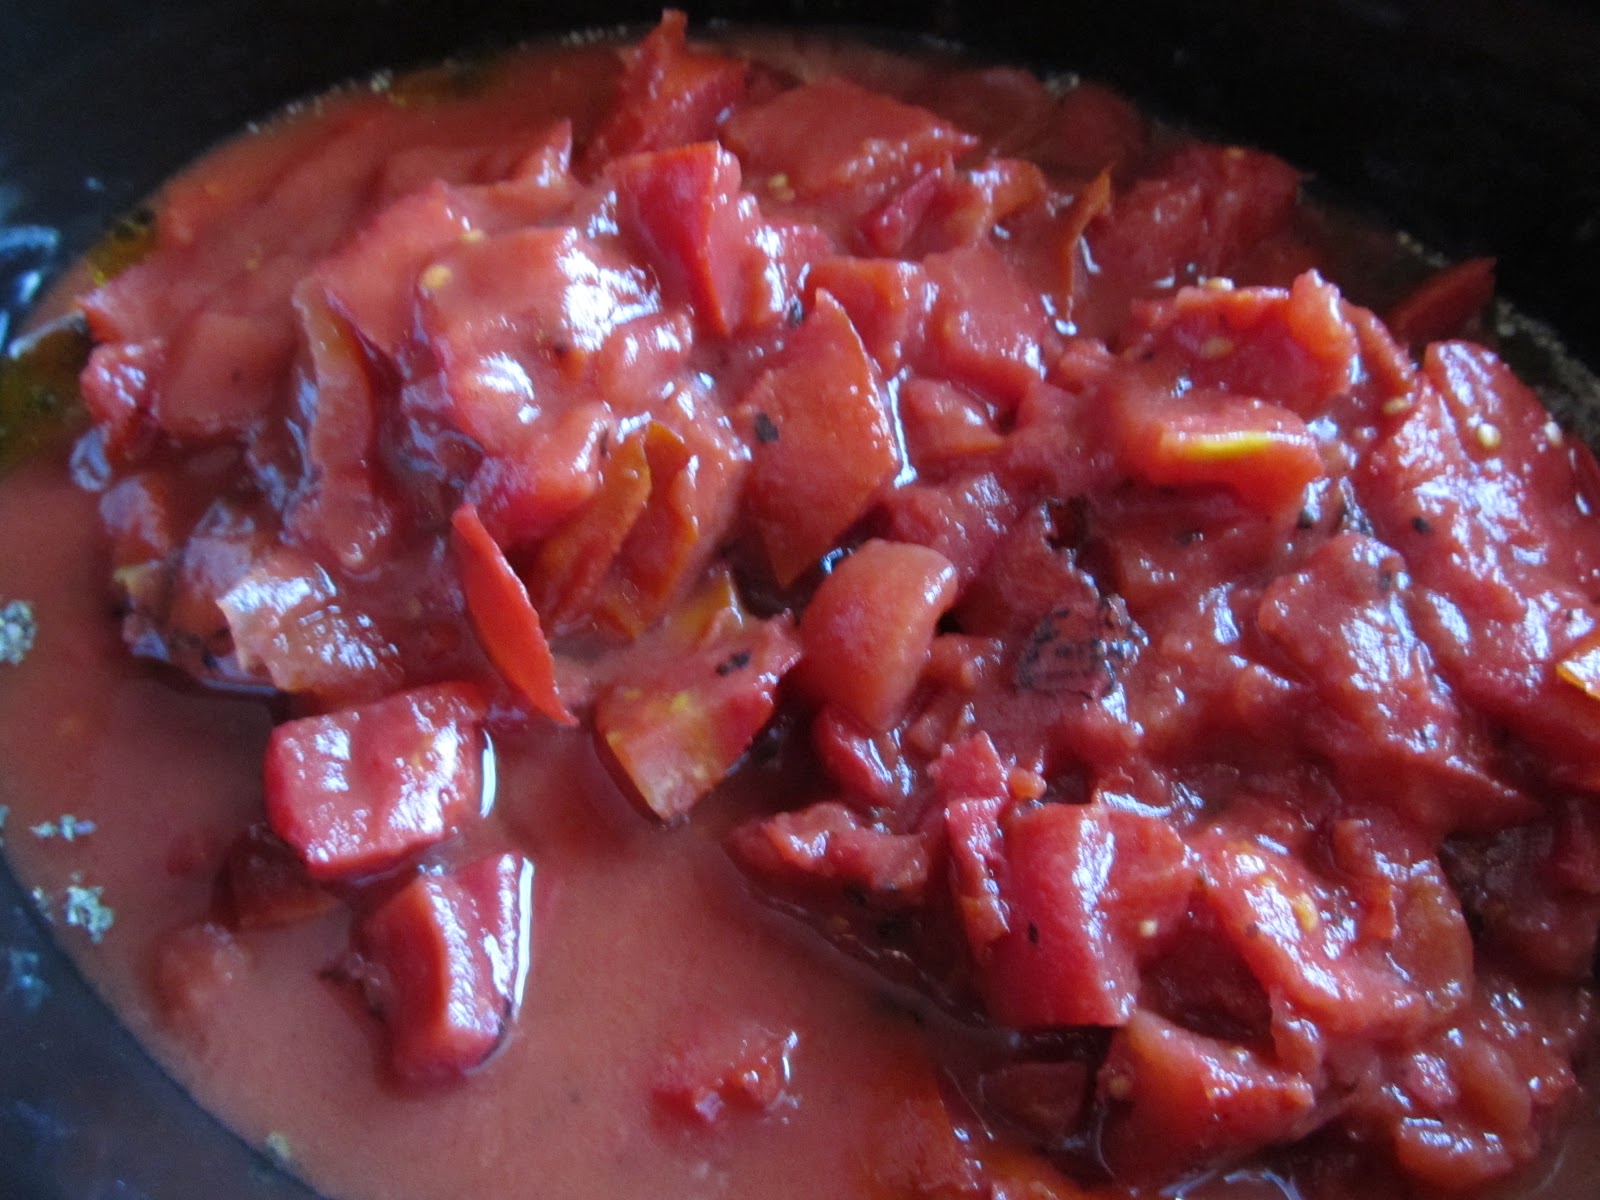
     Cut an 8 ounce loaf of stale Italian Bread into cubes (about 8 cups), or if you cook like I do...tear it into pieces. Put the cubes into the greased pan. Add a 1 pound bag of frozen peaches and 2 cups of fresh blueberries to the bread in the pan and sprinkle with cinnamon. The recipe calls for 1/4 tsp., but we like cinnamon...I just sprinkled away! Toss the bread, fruit and cinnamon together in the greased pan.


 In a separate bowl, beat 6 eggs


Slowly whisk in 2 cups of whole milk, 1 cup half and half and 3/4 cup of sugar
Stir in 1 tsp. of vanilla and a pinch of salt.


     At this point, it looks and smells like it could be frozen custard. Tempting to get out the little ice cream freezer, but I did promise my husband breakfast!


     Pour the egg mixture over the bread and fruit and let it sit at room temperature for 30 minutes. You can also get to this step and put it covered in the refrigerator overnight. Press down on the bread pieces to make sure they all get soaked into the milk/egg mixture. After waiting 30 minutes, put into the 350 degree oven for 1 hour. 
 

When it is done, it looks like this!


     This is the cookbook. The recipe says it makes 8 servings at 344 calories each. True confession: We each ate almost 2 servings. I will worry about that tomorrow!


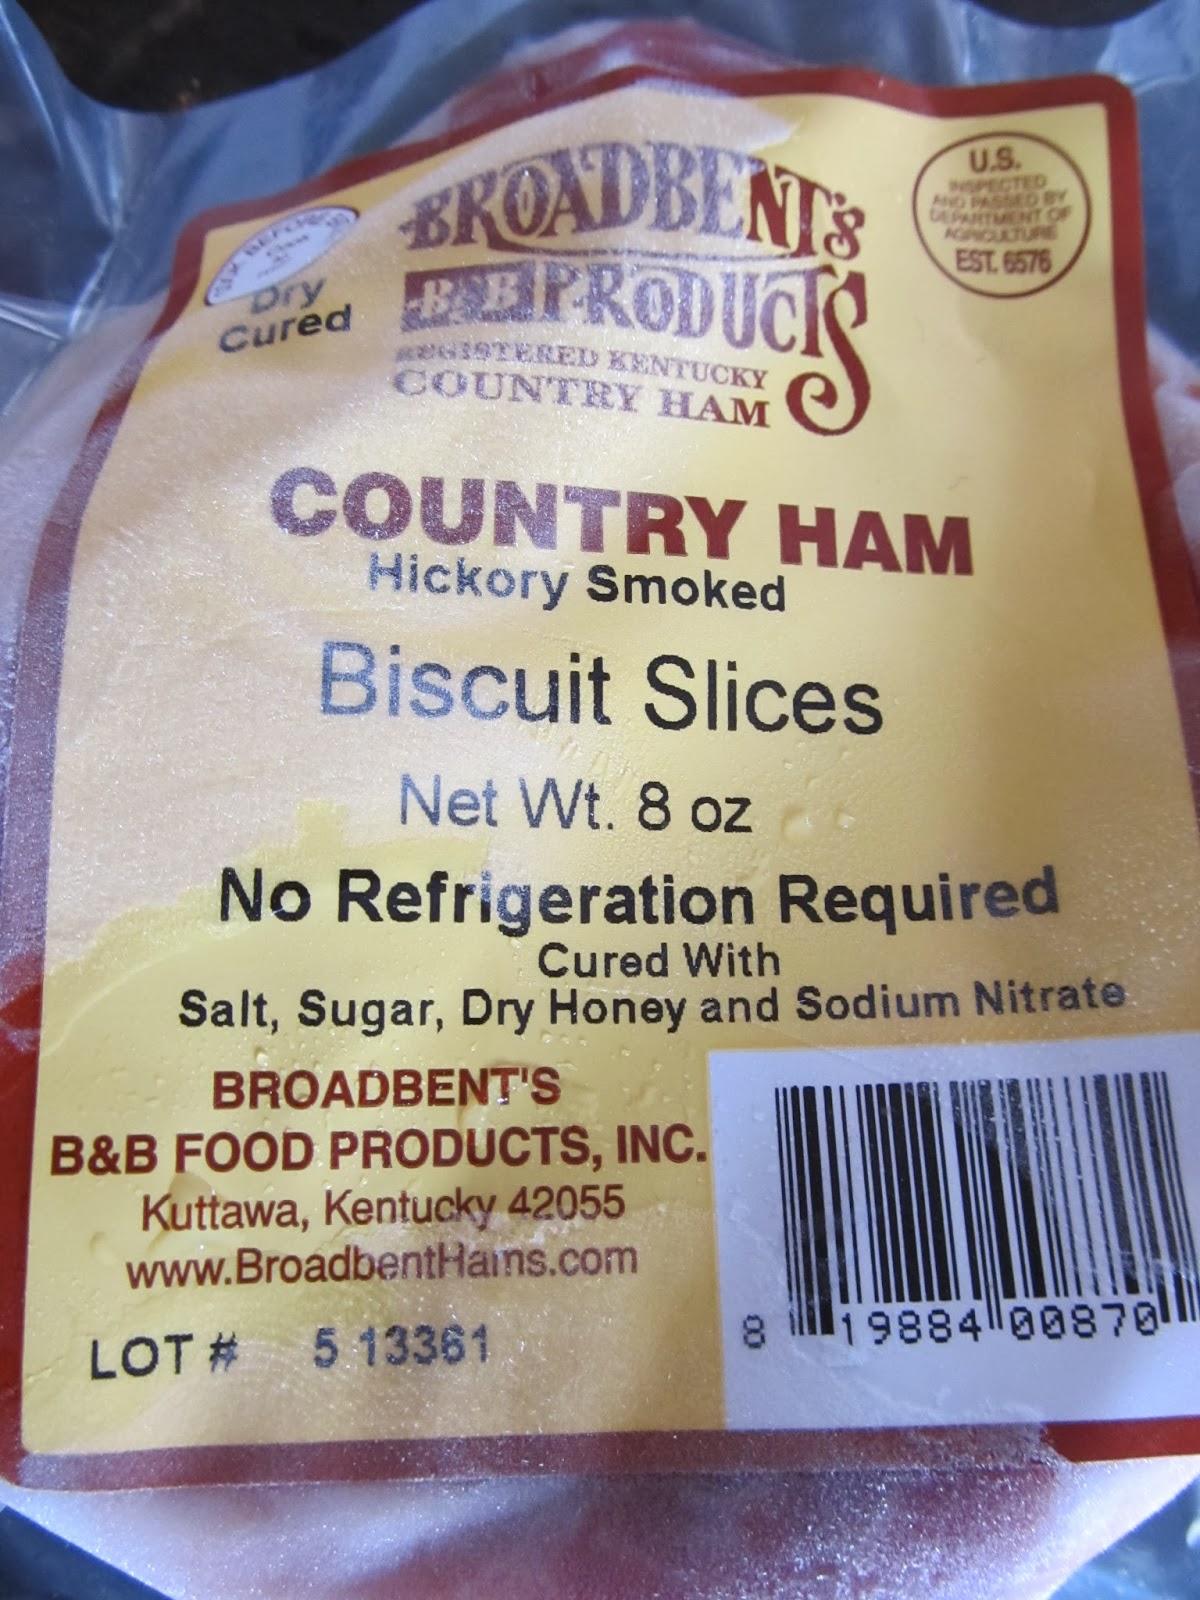
     I may have mentioned Broadbent's in Kentucky in a previous blog post. We get all of our bacon there and have for so many years I can't remember when we didn't. It is simply the best. My husband also loves the ham steaks and these little biscuit ham slices. I find them too salty (but I had one anyway) for my taste, but the bacon is perfection. We get ours on trips to Florida, but they do have a mail order catalog. 


I usually drink my coffee black, but I had a little 
of that half and half left over...and it is a holiday!


     We were supposed to wait until the casserole cooled a little so it would be in pretty squares on our plates. It smelled so good, we just couldn't wait. This recipe is a keeper. We both loved it! 

Wishing you all the Happiest of New Years!

Thursday, October 31, 2013

Molasses Cookies (Soft)


     I wish I could take credit for this recipe, but I can't. These are actually called Sugared Molasses Crinkles and I found the recipe in Where Women Cook, Celebrate! The recipe was submitted by Ashley English, who is an author and a weekly blogger for Design*Sponge. I was looking for a non-chocolate, fall cookie for dinner guests and I loved the rich, brown color of these cookies.

Ingredients: (I doubled her recipe)

5 cups all-purpose flour
1 T. baking soda
2 tsp. salt (I used a little less)
1 T. cinnamon
1 T. ground ginger
2 tsp. ground nutmeg
1 tsp. ground cloves
1 tsp. ground black pepper
2 cups dark brown sugar
1 1/2 cup granulated sugar (divided)
2 sticks butter at room temperature
4 eggs
2/3 cups molasses

Preheat oven to 350 degrees

 
     I don't always sift my dry ingredients, but because of all the spices...I did so for this recipe. Sift together flour, baking soda, salt, cinnamon, ginger, nutmeg, cloves and black pepper in a bowl and set aside.

 
With a mixer, beat the brown sugar and 1/2 cup
of the white sugar and the butter until combined.

 
Add the eggs one at a time, stopping to scrape
the bowl after each egg.
 
 
Add the molasses
and completely incorporate.


On low speed, gradually add the flour
mixture until completely blended.

 
Cover dough with plastic wrap and chill one hour.

 
     Roll cookies into balls and roll in remaining 1 cup of sugar to cover. Place on cookie sheets (you can use parchment paper if you want to) and bake until centers are firm, 12-15 minutes. Cool 5 minutes on cookie sheets and transfer to wire racks.

 
These made the house smell so
good and are a perfect fall or Christmas cookie.
 
     I have no idea what happened to this week. My birthday was Tuesday and between girlfriend visits and appointments, it has been days since I picked up more than my iPad to check my emails. I hope you all have a safe, dry Halloween. We have been raining all day, but it has finally stopped. I hope it holds off for the little ones.

Wednesday, October 2, 2013

Grilled Cheese and Tomato Soup...Casserole??

 
     Often when my husband is home for lunch, we see Mr. Food segments at the end of our news program. A few days ago we happened to catch a segment called Grilled Cheese and Tomato Soup Bake. Because we were kids in the 60's, tomato soup with a grilled cheese sandwich was a staple in both of our homes. We watched the preparation of this dish with a mixture of interest and horror. It sounded awful, but when all was said and done...it looked pretty good. So, I decided to give it a try.
 
     The only change I made to the Mr. Food recipe was using 1 T. of butter instead of 3 to lighten the dish. I also used a mixture of shredded cheeses because that is what I had at home.
 
Ingredients:
3 T. softened butter  (I used 1 T. and melted it)
1 pound French bread sliced into 22 slices 
2 1/2 cups shredded Cheddar cheese, divided 
(I used cheddar and 4 cheese blend)
1 can Campbell's Cream of Tomato soup
1/2 cup milk (I used skim)
 
Preheat oven to 425 degrees
 
     Spread or brush butter on one side of the 22 bread slices and place on baking sheet. Bake 5 to 7 minutes, turn over and bake another 5 minutes. You want both sides to be slightly toasted and crispy to the touch.
 

Split your cheese into 1 1/2 cups and 1 cup.

 
Mix the soup with the milk until blended.


Remove the toasted bread from the oven
and place 11 slices into a 9x13 casserole dish.
It didn't say to grease the dish,
I wish I had sprayed it with PAM

 
Sprinkle the 1 1/2 cups of
cheese on top of the bread.

 
Top with remaining 11 slices of bread.

 
Pour soup mixture over the top

 
Bake 20 minutes at 425 degrees

 
Remove from oven and top with remaining
1 cup of cheese

 
Return to oven for 10 minutes.
 
 
     The verdict...it was really good. My husband loved it, he even had a second helping which is very rare for him. My son came the next day and ate the leftovers warmed in the microwave and loved it too. He asked for the recipe! He liked that it was not only easy, but cheap to prepare. I thought it was really good. I think it would be a great companion to serve with chili or soup. It warmed up well the second day but the piece leftover the 3rd day was drying out according to my husband. I do think this is best served right from the oven. The bottom remained crisp and the top wasn't too soggy and only had a slight tomato taste. If I wasn't trying to be a "healthy" eater, I would use the full amount of butter and even more cheese between the slices of bread. This is hardly a gourmet meal, but quick, easy, inexpensive and tastes a bit like our childhoods. Sometimes that is all you need!


Friday, March 8, 2013

Healthy Tomato Basil Soup (159 calories)


     I continue to look for recipes that I can adapt into healthy versions and this Tomato Basil soup was a success. I want to warn you ahead of time that I actually made mine in the crockpot and it worked just fine (4 hours on low heat) but it was really, really ugly before it went into the blender. There is a picture below, just so you know that you didn't ruin it! This would be easy to make quickly without the crockpot, I simply wanted to see what happened when it slow cooked.

 
Serving size is 1 1/4 cups for only 159 calories
per serving when entered into my calorie calculator.
 
 
In your pan or crockpot add:
 
1 T. olive oil
1 T. dried basil (or fresh basil if you have it)
pinch of garlic powder (to taste)
4 cans Fire Roasted Tomatoes (do not drain)
8 oz. 1/3 less fat cream cheese
2 cups skim milk
salt and pepper to taste
 
Heat through until cheese melts and place in small batches into the blender (the soup will explode when hot if you put very much in the blender-hold the lid on). Pulse until creamy.


Tomatoes and oil in crockpot
 
 
All ingredients in crockpot
 
 
Gross and ugly looking soup as I am dipping it into the blender
 
 
Creamy and delicious after blending.
 
     I got a new laptop today and I'm trying to get things switched over and getting a feel for the new keyboard. I also have to learn the tricks of Windows 8 so who knows how many errors you will see in the next few days!
 
I am joining Michael @ Rattlebridge Farm
for Foodie Friday


Monday, December 10, 2012

Cookie Time!

 
     Back in the days of children at home, neighbors that exchanged gifts and a busy social calendar around the holidays, cookie baking was a big deal at my house. It was not unusual for me to make 10 or 12 different kinds of cookies and dozens of each kind. These days, the house is quiet around the holidays, neighbors don't "neighbor" the way they did in our old home town and the kids aren't here. My husband would rather eat Little Debbie Oatmeal things (fake-icky) than homemade and I would be in big trouble, eating my way through everything! I still make sugar cookies that my husband likes and a candy that is my daughter's favorite (recipe coming in a later post).
 
     I made these cookies last year and simply linked the recipe. This year, I thought I would actually show you the process. I have made several sugar cookie recipes over the years and we have decided these are our favorite. The recipe makes a huge batch and while this year I actually rolled them out and used cookie cutters, last year I rolled them into balls and slightly flattened them before baking. It is much faster that way. If you have ever had Cheryl's Cookies (mail-order), these taste very similar. They are soft, not overly sweet and have an excellent flavor.
 
NOTE-One batch of frosting doesn't quite make enough for all the cookies. We don't mind having a few without frosting, so I just make one batch. If you want to frost all the cookies...double the frosting recipe.
 
Ingredients:
6 egg yolks
4 whole eggs
2 cups real butter (soften to room temperature)
2 1/2 cups sugar
7 c. flour
1 T. baking powder
1/2 tsp. salt
1 1/2 tsp. vanilla
 
Frosting:
1 pound powdered sugar
1/2 c. butter (soften to room temperature)
1-2 T. milk
1 tsp. vanilla


In large mixing bowl, cream butter and sugar until smooth.
 
 
     I like to put my eggs (the 6 yolks and the 4 whole eggs) into a glass or measuring cup before I start the mixing process. It makes it easy to add them to the butter/sugar mixture. After the butter and sugar are smooth, add in the eggs, one at a time and blend until smooth.

 
     In a separate bowl, place the flour, salt and baking powder. Slowly stir (first by hand and then with mixer) the dry ingredients into the sugar/butter/egg mixture. You can see above how yellow the wet ingredients are from all those egg yolks.


     You will end up with a large bowl of slightly stiff batter which you should chill for one hour before forming into cookies.

 
Preheat oven to 375 degrees
 
     After an hour, take part of the batter and form into a ball. On a floured surface with a floured rolling pin, roll the dough out to 1/2 inch thick and cut your shapes with cookie cutters. You can also just take the chilled dough and roll it into tablespoon sized balls at this stage and flatten them before baking. Bake on greased cookie sheets (I lightly ran the butter wrappers over my cookie sheets) for 8-10 minutes. You do not want them to brown around the edges. Allow to cool on cookie sheets for 5 minutes before moving to racks to cool completely.
 
     For the frosting; blend softened butter, powdered sugar, vanilla and milk with a mixer until smooth. You want the frosting to be smooth and spreadable, but still somewhat thick. Add milk very slowly until you get the texture you want. At this point, you can separate the frosting into small bowls if you want to color it a variety of colors. I wanted most of the cookies to be simple since I have to transport them to Florida. I cut most of mine with a biscuit cutter and frosted them with white frosting and added sugar/sprinkles.


     I tinted a little bit of the icing blue and cut out a few large snowflake cookies, topped with snowflake sprinkles. They really looked like snowflakes before I frosted them...now, they look a little bit like crabs!


Nothing says Christmas like the smell of cookies baking. 


Monday, September 10, 2012

I think I can...I think I can!

 
     It probably comes as no surprise that I am a Foodie. I like to try new things, particularly those things that are specific to an area. I eat fried green tomatoes in the South, beignets in New Orleans and crab legs when I'm at the ocean. I always say I don't like liver and lima beans...or wild game. I also didn't think I liked Sushi. I had only tried it once, from a grocery store and after one bite I swore I wouldn't eat it again.

     While in Orlando last month, my daughter really wanted me to go to her favorite little sushi restaurant. She knows me so well and she swore that there were things that I would like if I'd just give it a chance. I decided if she could eat it...I just might be wrong.

     When I thought of sushi, I thought "raw fish". I have found in conversations since coming home, most people who say they won't eat it think the same thing. I had no idea of the options available that weren't raw and many aren't even fish.

     The above first picture is the pretty platter my husband and I shared in Orlando. There is nothing raw on the plate. One roll is made with a tempura (fried) shrimp in the middle, one with avocado, one with cucumber and cream cheese and one (with the curly stuff on top) has the fried shrimp along with cream cheese and conch. All have sticky rice and Nori (seaweed) which doesn't really taste much in fresh sushi. We loved it all. I was really nervous to put one of those big bites in my mouth and so pleasantly surprised at how good it was!

     In the weeks since, we have had sushi at two other locations closer to home. We can't get it in our town, so I decided to attempt to make it...and it worked! I was able to buy the ingredients at Walmart and didn't buy any special equipment, although most would suggest buying a bamboo rolling mat to help roll the sushi. I used parchment paper with plastic wrap and it worked just fine. I didn't attempt to do any shrimp frying. I opted to make veggie sushi.

 
     The ingredients are few and inexpensive. I found them in the Asian section of the store. Sushi rice, Nori, rice vinegar, a little sugar,sesame seeds and whatever veggies you want to put in the middle. I used avocado, cucumber, carrot and cream cheese in various arrangements.

 
Step one: A sheet of parchment paper covered with plastic wrap.

 
     Step 2: Cook the rice. You can find many recipes online for preparing the rice. After it cooks, it is mixed with a small amount of the rice vinegar mixed with sugar (my recipe mixed the two and microwaved them for 30 seconds) and then it has to cool at room temperature. This is the step that takes a while but has no work involved.

 
     Some sushi has the rice on the inside and the Nori on the outside, some is reversed. I made both. The rice is very sticky, so you wet your hands and pat it on the nori. If you want the rice on the outside, simply place another sheet of plastic wrap over the top and flip it over. The rice will still stick.

 
Slice your veggies into long strips.

 
Cream cheese and avocado-rice on the outside.

 
Cucumber and carrot-rice on the inside.

 
Slicing the cream cheese.

 
     Using the plastic wrap to help, slowly roll the Nori into a tight roll. Take it slowly and press the roll together as you go along. When the roll is complete, dampen the edge of the Nori with a little water and seal it to itself. You can immediately slice the roll into slices, sprinkle with sesame seeds and serve with wasabi or soy sauce.

 
     Mine isn't nearly as beautiful as what we got in the restaurants, but it turned out pretty well for my first try. My husband said he thought it tasted very much like the restaurant sushi. I thought it was good. I was a little heavy handed with the rice and it was a bit too thick. I also think the Nori at the restauants had less of a taste than the dried I bought at the grocery store. It was actually fun to make!